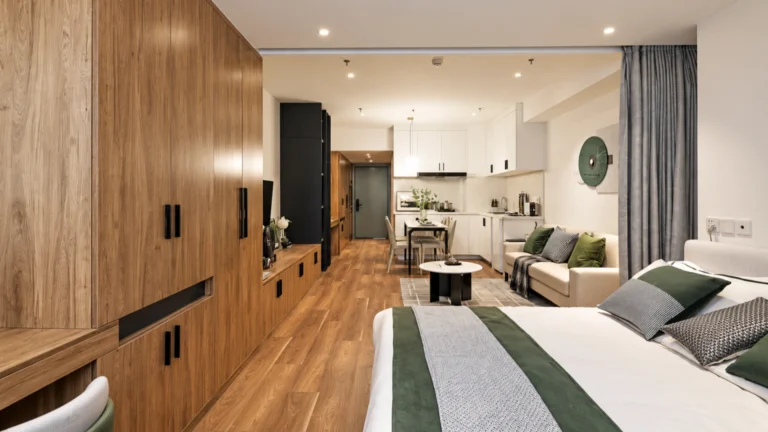
In a hotel project, the same finish may be repeated across dozens or even hundreds of wardrobes, TV units, minibars, headboards, vanities, and wall panels. Small differences in color, grain direction, texture, or sheen can therefore become highly visible when furniture is installed across multiple guestrooms and public areas.
A color name or reference image alone is not enough for accurate pricing, sampling, or bulk production. A complete joinery finish schedule should identify the finish code, material source, product reference, color, texture, grain direction, sheen level, application area, and approved sample. These details allow designers, contractors, procurement teams, hotel owners, and joinery manufacturers to work from the same controlled information.
This guide does not repeat a general comparison of furniture substrates. Instead, it explains how hotel joinery finishes should be recorded, coordinated, reviewed, and approved before production. The goal is to create a practical joinery finish specification that protects the design intent while improving quotation accuracy, sample control, manufacturing consistency, and final installation quality.
What Is a Joinery Finish Schedule?
A joinery finish schedule is a controlled project document that identifies the approved surface finish for each joinery item and records the information required for sampling, manufacturing, installation, and quality inspection.
Each finish is normally assigned a unique code and linked to a specific furniture item, surface, location, or room type. The schedule should identify the finish material, manufacturer or supplier, product reference, color, texture or grain, sheen level, approved sample, and current revision status. For example, the external veneer on a wardrobe may use one finish code, while its internal laminate, edge treatment, handles, and metal trim use separate codes.
A finish schedule works together with other project documents rather than replacing them:
| Project Document | Main Purpose |
|---|---|
| Material Specification | Defines general material and performance requirements |
| Joinery Finish Schedule | Assigns an exact finish code to each surface and item |
| Shop Drawing | Shows dimensions, construction, and finish locations |
| Approved Finish Sample | Provides the physical reference for color, texture, and workmanship |
| Mock-Up | Confirms how the complete furniture item looks and performs |
The schedule tells the project team which approved finish applies, while the shop drawing shows where it is used and the physical sample confirms what it should look and feel like. Together, these references reduce unclear interpretations during quotation, sampling, and production.
For more information about substrates and performance, refer to the Casegoods Material Guide. For drawing coordination and approval requirements, see the Hotel Furniture Shop Drawing Checklist.
Anatomy of a Clear Joinery Finish Schedule
An effective furniture finish schedule should allow the project team to identify every visible surface without relying on assumptions. Each finish must have a unique code, an exact material reference, a defined application area, and a traceable approval record. The following fields provide a practical structure for hotel joinery projects.
Recommended Finish Schedule Fields
| Schedule Field | What It Should Confirm |
|---|---|
| Finish Code | Unique project reference, such as VN-01, LM-02, LC-03, or MT-04 |
| Joinery Item | Wardrobe, TV unit, minibar, vanity, headboard, or wall panel |
| Surface Location | Door face, side panel, interior panel, countertop, edge, or metal trim |
| Material Type | Veneer, laminate, lacquer, metal, or another approved finish |
| Brand/Supplier | Approved manufacturer, supplier, or material source |
| Product Code | Exact commercial product or collection reference |
| Color | Approved color name, manufacturer code, or matched control sample |
| Texture | Smooth, textured, brushed, embossed, or another defined surface |
| Grain Direction | Vertical, horizontal, book-matched, slip-matched, or sequence-matched |
| Sheen Level | Matte, satin, semi-gloss, gloss, or an approved sheen range |
| Edge Finish | Matching edge band, solid timber edge, painted edge, or exposed detail |
| Sample Reference | Approved sample number, approval date, and approving party |
| Drawing Reference | Related shop drawing, elevation, section, or detail number |
| Revision | Current document revision, issue date, and approval status |
Each finish code must identify the same approved finish across the schedule, shop drawings, samples, mock-ups, and production documents. General descriptions such as “walnut finish” or “brushed gold” are not enough because they do not confirm the exact material, color, texture, grain direction, or sheen.
Different surfaces may require different codes. For example, a wardrobe may use veneer doors, laminate interiors, lacquered edges, and metal handles. While a joinery material schedule lists the materials used, the finish schedule defines the final visible appearance and its approved reference.

How to Specify Veneer, Laminate, Lacquer and Metal Finishes
A finish schedule should not simply name the material. It must record enough information for the supplier to source it, the manufacturer to reproduce it, and the project team to inspect it. The required details vary according to the finish type.
1. Veneer Finish Specification
A veneer finish specification should record:
- Natural or engineered veneer
- Wood species and veneer cut
- Grain direction and matching method
- Stain color and coating
- Sheen level
- Approved control sample
The same wood species can vary in color and grain, so shop drawings should clearly show the wood veneer grain direction and matching method: book matching creates a mirrored pattern, slip matching keeps the grain aligned, and random matching produces a more natural appearance. For large projects, approve a realistic range of samples rather than one ideal piece to provide a practical standard for veneer batch consistency.
2. Laminate Finish Specification
A laminate finish specification should record:
- Brand, collection, and product code
- HPL, CPL, or other approved type
- Color and surface texture
- Sheet size and application direction
- Matching edge band
- Interior and exterior finish codes
- Required substrate
Descriptions such as “wood-look laminate” are not specific enough for purchasing, so the schedule should include the exact laminate product code, grain direction, panel alignment, and matching edge band. If the selected joinery laminate finish is unavailable or discontinued, any replacement must be sampled and approved before production.
3. Lacquer Finish Specification
A lacquer finish specification should record:
- Standard or custom color reference
- Matte, satin, or gloss finish
- Substrate and surface preparation
- Coating system
- Edge and corner treatment
- Approved sample
- Touch-up requirements
Terms such as “white lacquer” or “matte beige” are too general, so the finish schedule should include an exact color code or signed control sample. Because lighting and gloss affect the final appearance, lacquer color and sheen should be reviewed together on the intended substrate, with flat surfaces, edges, joints, and corners matching the approved finish.
4. Metal Finish Specification
A metal finish specification should record:
- Base metal
- Finish or coating process
- Color code
- Texture and gloss level
- Brushing direction
- Protective coating
- Weld and joint treatment
- Application environment
- Approved sample
“Gold metal” or “bronze finish” is not a complete specification, so the schedule should identify the base metal, finish process, color, and approved sample. For a brushed metal finish, confirm the brushing direction and coordinate handles, legs, trims, and lighting to avoid visible differences. Any protective requirements for a powder-coated metal finish or wet-area application should follow the project specification, local conditions, and cleaning method.

From Design Intent to Approved Production Finish
A hotel joinery finish develops through several coordinated stages. Moving directly from a design image to bulk production increases the risk of unavailable materials, unclear finish descriptions, inconsistent samples, and unapproved substitutions. The following process turns the design concept into a controlled production reference.
Recommended Finish Development Process
1.Establish the Design Palette
The design team defines the intended relationship between veneers, laminates, lacquer colors, metal finishes, stone, fabrics, and lighting. At this stage, the objective is to establish the overall visual direction rather than finalize every supplier reference.
2. Assign Preliminary Finish Codes
Each proposed finish receives a unique code, such as VN-01, LM-02, LC-03, or MT-04. The codes are assigned to specific joinery items and surfaces so the team can identify where every finish will be applied.
3.Confirm Available Materials
The manufacturer checks the proposed materials against supplier availability, sheet sizes, minimum order quantities, batch supply, lead times, fabrication methods, and project budget. Any technical or sourcing limitations should be reported before samples are prepared.
4. Prepare Finish Samples
Samples should use the specified substrate, veneer, laminate, lacquer system, metal process, edge treatment, texture, and sheen. Each sample must be labeled with the project name, finish code, supplier reference, date, and revision.
5. Review Samples Under Project Lighting
Colors and sheen levels may appear different under daylight, warm lighting, or cooler commercial lighting. Samples should therefore be reviewed under lighting conditions that are reasonably representative of the intended hotel space.
6.Revise and Approve the Control Sample
Comments should be recorded and incorporated into a revised submission. Once accepted, the signed or formally approved control sample becomes the visual benchmark. Verbal acceptance should not replace the project’s documented approval process.
7. Apply Finishes to the Mock-Up
The approved finishes are applied to a complete furniture prototype or mock-up room. This stage checks how veneer, laminate, lacquer, metal, stone, fabric, and lighting work together at full scale.
8. Freeze the Production Finish Schedule
Bulk production should begin only after the final schedule, control samples, relevant shop drawings, and mock-up comments have been coordinated and approved. Later substitutions or revisions require documented review before implementation.
Responsibilities are shared across the project. The designer protects the design intent, while the contractor coordinates site conditions and project documents. The manufacturer confirms sourcing and manufacturability, and the procurement team reviews scope, cost, and supply. Final authorization belongs to the owner, consultant, or other party identified in the project contract.

Conclusion
A reliable joinery finish schedule turns the design palette into a clear production reference. Unique finish codes should identify the exact material, color, texture, sheen, application area, and approved control sample without leaving critical details open to interpretation.
Consistency is equally important. The finish schedule, shop drawings, physical samples, and mock-up must show the same approved hotel joinery finishes. Any change to a material, code, supplier, or appearance should be updated across the related project documents.
Bulk manufacturing should begin only after final coordination and formal finish schedule approval. By controlling the approved revision and retaining master samples, project teams can reduce substitutions, visual inconsistencies, and avoidable rework. CenSo Home supports hotel projects with finish development, sampling, shop drawing coordination, and production control for custom joinery.

Mavis Chen
Mavis Chen is the Marketing Operations Manager at CenSo Home, with 14 years of experience in building materials and furniture. She creates practical content on hotel furniture, custom cabinetry, materials and international project requirements.